Rod pocket curtains feature a sewn channel at the top where you slide your rod through, creating elegant fabric folds that conceal the rod completely. To hang them, you’ll position brackets 4–6 inches above your window frame, extending 6–12 inches beyond each side. Measure your window width and multiply by 1.5–3 for fullness, then slide the rod through the pocket and center it on mounted brackets. Add finials to hide rod ends and tiebacks for polish. The specific techniques make all the difference in achieving that picture-perfect finish.
What Rod Pocket Curtains Are
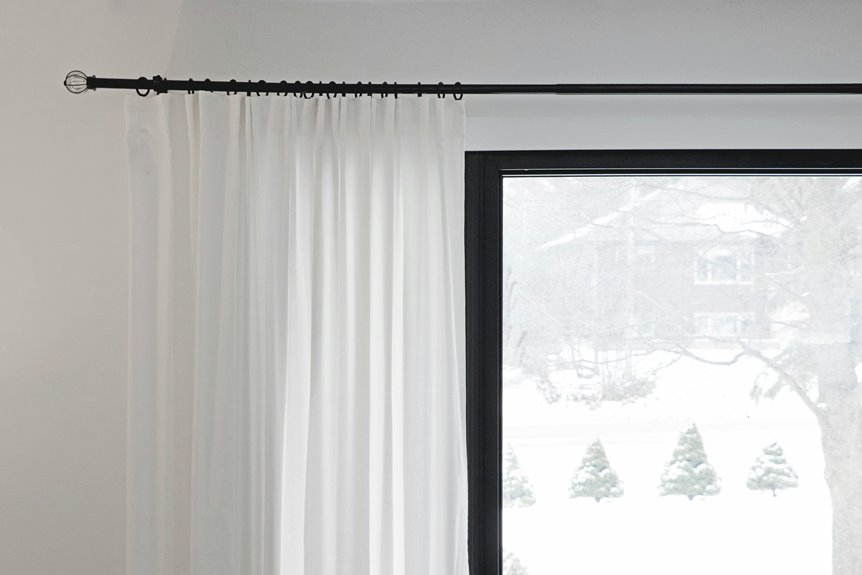
Ever wonder how some curtains hang so smoothly without visible hardware? Rod pocket curtains achieve that sleek look through a sewn pocket running along the top. You simply slide your curtain rod through this channel, and the fabric folds over it beautifully.
These curtain pockets work with various rod sizes thanks to their adjustable design. The fabric conceals the rod while keeping the decorative ends visible, creating a polished appearance. You’ll find rod pocket curtains crafted from affordable materials like cotton, making them budget-friendly options.
Their versatility shines through. You can layer them with other window treatments to build a cozy, inviting atmosphere. They’re lightweight and ready to hang straight from the package, offering practical elegance for any room seeking a relaxed, homey feel.
Select Rod Material and Style

Several rod choices’ll shape how your curtains look and function. You’ll find metal rods offer durability and a sleek appearance, while wooden rods bring warmth and traditional charm to your space. Consider your pocket size carefully, since rods range from half-inch to one-inch diameters.
The style you pick matters too. Decorative finials, those ornamental end caps, hide exposed rod ends and add personality. They work especially well with rod pocket designs that naturally bunch at the top.
Think about your room’s vibe when selecting materials. A minimalist apartment might call for brushed metal, while a cozy bedroom suits natural wood. Match your rod to your overall aesthetic, and you’ll create a cohesive, inviting window treatment that feels intentional and thoughtfully designed.
Measure Your Window Width and Length

You’ll need accurate measurements to determine both your fabric fullness and your curtain’s finished look. Your window width drives the fullness decision—measure at 1.5 times the width for a tailored appearance or 2.5 to 3 times for luxurious, gathered folds that really make a statement. Then measure your window length to choose whether you want your curtains to hit the sill, extend to the apron, reach the floor, or puddle elegantly below it, and always use a steel measuring tape to avoid the installation headaches that come from guessing.
Width Determines Fabric Fullness
How much fabric do you actually need to hang those rod pocket curtains? Your window width measurement directly determines how full and luxurious your curtains will look when hung. You’ll want to multiply your window width by 1.5 to 3 times that measurement for proper fabric fullness.
For a tailored, neat appearance, aim for 1.5 times your window width. Want something more dramatic and elegant? Go for 2.5 to 3 times the width instead. This extra fabric creates those beautiful folds and gathers that make curtains look professionally installed rather than skimpy.
Getting your width measurement right prevents two common problems: curtains that don’t fully cover your window, or fabric bunched so tightly it looks awkward and bulky.
Length Options For Style
Once you’ve nailed down your width measurement, it’s time to pick how long you want those curtains to hang. Your curtain length choice sets the tone for your entire room’s vibe.
You’ve got four main options to consider. Sill length hits right at your window’s bottom edge—perfect for a clean, tailored feel. Apron length drops a few inches below the sill, adding subtle elegance. Floor length reaches down to kiss the ground, creating a formal, polished look that works in most spaces. Puddled length pools extra fabric on the floor for maximum luxury and drama.
Your room’s height and personal style guide this decision. Taller ceilings pair beautifully with floor or puddled lengths. Shorter rooms benefit from sill or apron options. Measure from your rod to your chosen endpoint for accuracy.
Accurate Measurements Prevent Problems
Why do so many curtain projects fail right out of the gate? Inaccurate curtain measurements are the culprit. You’ll want to grab a steel measuring tape—not a fabric one—for precision that matters.
Measure your window width first. You’ll need 1.5 times the width for tailored looks, up to 2.5–3 times for luxurious gatherings. This simple calculation prevents short, bunched curtains that disappoint.
Next, measure your length from the rod to your desired endpoint. Are you going floor-length or just below the sill? Each choice demands different precision.
When layering curtains, measure both separately. Mismatched measurements cause alignment problems and installation headaches you’ll want to avoid. One steel tape. Two measurements. Problem-free results.
Position and Install Your Rod

Now that you’ve measured your window, you’re ready to position and install your rod—the foundation for hanging your curtains properly. You’ll need to decide where your brackets go, secure them firmly into your wall, and then thread the rod through those fabric pockets you’ve sewn. Getting these three steps right ensures your curtains hang evenly and look polished.
Bracket Placement and Spacing
How you position your rod brackets makes all the difference in hanging curtains that look polished and hang evenly. Place brackets 4–6 inches above your window frame. This positioning creates a balanced, intentional look while providing proper clearance. Extend brackets 6–12 inches beyond each side of the window. This extension allows curtains to fully clear the glass when open, maximizing natural light and visibility.
For extra-wide windows, you’ll want a center support bracket. This prevents rod sagging and keeps your curtains hanging straight and uniform across the entire width. Mark all bracket positions precisely before drilling. Use a level to ensure accuracy. Drill pilot holes first, then securely fasten brackets to your wall or window surround with appropriate hardware. Proper bracket placement guarantees professional-looking results.
Securing Hardware Into Walls
Before you pick up a drill, you’ll need to mark exactly where your brackets go—and this step shouldn’t be rushed. Align your curtain rod brackets with the window’s center, ensuring both brackets match perfectly. A stud finder becomes your best friend here—use it to locate wall studs whenever possible for maximum stability.
Can’t find studs? No problem. Install wall anchors appropriate for your wall type instead. Before inserting any screws, drill pilot holes to prevent wood splitting and guarantee bracket stability. This small extra step makes a real difference in how securely everything holds.
Position brackets 4–6 inches above your window frame and 6–12 inches beyond the sides. For extra-wide windows, add center support to prevent rod sag. You’re creating a foundation that’ll keep your curtains hanging beautifully for years.
Threading Rod Through Pockets
With your brackets secured and hardware in place, it’s time to thread the rod through those fabric pockets—and honestly, this is the easiest part. Start from one end and insert the rod through the curtain pocket opening at the top. Slide it smoothly across the entire width until both ends rest securely in your brackets.
The fabric pocket accommodates most standard rod diameters, so you won’t struggle forcing anything through. As you slide, straighten your curtain panel to ensure it hangs evenly. Check that the pocket sits properly at the top without bunching or twisting.
Once threaded completely, your curtain pocket stays mostly hidden behind the fabric. The rod-pocket design gives you an instant, ready-to-hang setup without additional clips or complicated hardware. Your curtains now hang beautifully and securely.
Mount Brackets Securely

Proper bracket installation makes all the difference between curtains that hang beautifully and ones that sag or shift over time. You’ll want to mark your holes carefully, drill pilot holes, and secure everything with screws for stable support that won’t budge.
Proper bracket installation makes the difference between beautifully hanging curtains and ones that sag or shift over time.
Position your brackets 4–6 inches above the window frame and 6–12 inches beyond each side. This placement gives you proper clearance and ensures your curtains look full and polished.
Always check that brackets sit level using a level tool. A straight bracket means your rod sits straight, and that means curtains hang evenly without twisting.
For extra-wide windows, install a center support bracket. This prevents rod sagging and keeps your curtains hanging uniformly across the entire width.
Hang and Adjust Your Panels

Now that your brackets are level and secure, you’re ready to hang your curtains. Sliding your curtain rod through the curtain rod pocket is straightforward, but getting it right makes all the difference.
Here’s what you’ll do:
- Slide the rod smoothly through the pocket, ensuring fabric feeds evenly on both sides
- Lift the panel onto your mounted brackets, centering the rod carefully
- Step back and adjust fabric so pleats form evenly across the entire panel
You might notice tiny rod ends peeking out—that’s completely normal. Finials hide these exposed ends beautifully, giving your treatment a polished, finished look. Take time adjusting your panels now. Even distribution creates that casual elegance rod pocket curtains are known for, and you’ll enjoy the results for years.
Style With Finials and Tiebacks

Have you noticed how a simple detail can transform your entire window treatment? Finials do exactly that. These decorative end caps slide onto your curtain rod, instantly hiding those visible rod ends while adding polish to your space. You’ll find finials in various styles—from sleek modern designs to ornate Victorian pieces—letting you match your room’s personality.
Tiebacks work alongside finials to complete the look. They’re fabric strips or cords that hold your curtains neatly to the sides, creating balanced, intentional draping. This combination keeps your panels looking fresh and prevents that rumpled appearance.
Together, finials and tiebacks transform basic rod pocket curtains into styled, finished windows. They’re affordable upgrades that deserve a spot in your design toolkit.
Care for Your Curtains

Your rod pocket curtains’ll last for years when you treat them right. Proper maintenance keeps them looking fresh and functioning smoothly.
Here’s what you should do:
- Gentle washing works best for most fabrics—use cool water and mild detergent to protect the pocket
- Follow specific fabric care instructions since cotton needs different treatment than budget materials
- Air dry whenever possible to maintain texture, color, and the pocket’s shape
Check the manufacturer’s label before washing. Some higher-end curtains require dry cleaning to preserve their ornate details. Dust them regularly with a soft brush to prevent buildup. This simple step extends their life substantially. Treat stains promptly using appropriate methods for your fabric type. With consistent, thoughtful care, your rod pocket curtains remain a stylish window feature.
Avoid Common Hanging Mistakes

Once your rod pocket curtains are clean and ready to display, proper hanging techniques matter just as much as maintenance does. You’ll want to choose a curtain rod that fits snugly inside your curtain rod pocket—this prevents sagging and keeps your panels looking polished. Don’t skip using finials; they hide those exposed rod ends that show when curtains close, giving you a more finished appearance.
Avoid pairing rod pocket curtains with traverse rods since they won’t operate properly together. Instead, stick with standard stationary rods. Check that your rod diameter matches your pocket’s opening before installation.
Finally, hang your curtains at the correct height. Position them slightly above your window frame, not directly on it. This simple step elevates your entire room’s aesthetic while ensuring your curtains hang beautifully.